I recently posted a photograph in response to a request to make a young lad a wizard. This simple composite seems like a good image to demonstrate how to create such an image. This isn’t a full tutorial, but gives you an idea of where to start.
The first thing you need to do is to plan a little. I knew what I was after and so at the end of a studio session we took this simple shot. We aren’t worried about the background lighting here. We want to light the model so there is light between his hands spilling on his face, (from a light positioned below) and what will be light from a window, so on the left as we look.
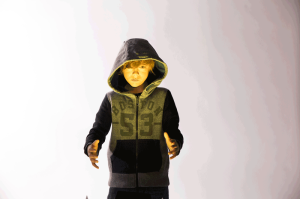
The basic studio shot. Here we aren’t worried about the background light, just the direction of the light source to match that in the final composite

Here we’e taken the image from the background with simple masking.
We’ve used masking to cut the model from the background and then carried out some sharpening and simple adjustments, knowing it will be a black and white final image.

Here’s the internal for where we want to place the wizard. It’s the wrong way round….
This factory shot gives us the look we want, but the light source in the wrong side, so we simply flip it.

Here’s our shot of the moon, background deleted
Here’s the moon. When popped in to the image it’s a little too sharp, so we soften it a little.

And this is our final image
The final image is a composite of the parts above. This is created in Photoshop, using layers (alway use layers!).
The final image is moody, better for the black and white treatment, and made for one very happy model!


